

What is a customer?
Customer is the entity that is used to model an organization which is your customer. Togai is meant for B2B software and SaaS products and hence we do not currently support the concept of ‘users’ which might be the customer for a B2C product. Togai’s customer entity is necessarily another business, company or an organization.The customer entity in Togai cannot have a price plan associated with it. It is parent entity that necessarily has atleast 1 child under it and the price plan can be associated only with the child entities.
Customer-account hierarchy
Accounts are the child entity that can be created under a customer. Price plans are always associated to an account entity only. A single price plan can be associated to multipe accounts as well.Every customer has to mandatorily have atleast 1 account, you can provide the account details along with the customer details when creating a customer. If you do not provide the account details, we will automatically populate the customer details for the 1st account - which will be auto generated by Togai.
Customer & account fields
We capture the following details for: Customers - Name, email, ID (unique), Phone number, Billing addressAccounts - Name, email, ID (unique), Phone number, Billing address, Currency, Net term days (credit period) You can add more meta data key value pairs for both customers and accounts in the Settings section.
Groups
You can generate standalone invoice for an account or group multiple accounts and generate a single consolidated invoice for them.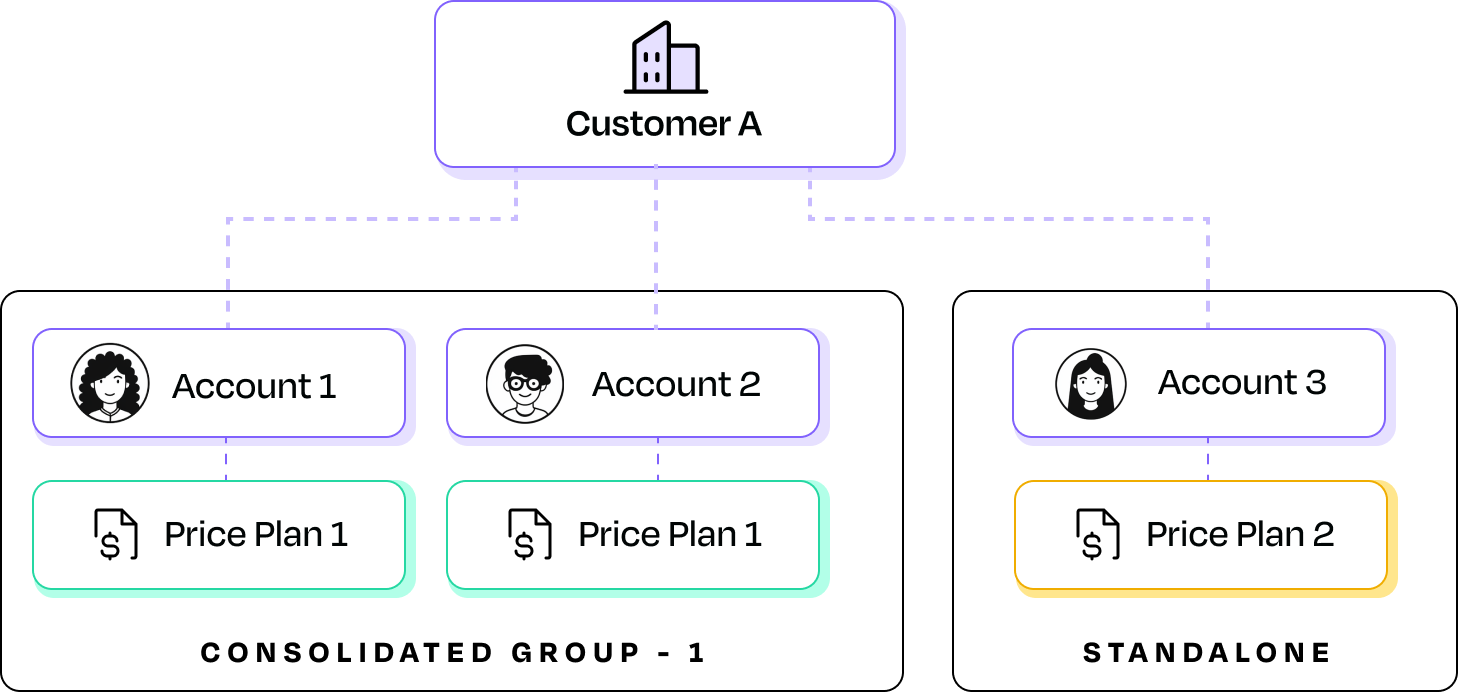
Customer account relationship
Types of modeling customers
- Single customer - direct - In this case you can create a 1-1 mapping for customer and account with the account containing the same details as the customer. This is the most simple and straightforward B2B scenario to configure.
- Single customer - test and production accounts - You can create a customer with multiple accounts under it where the same price plan is associated all the accounts of the customer. This is the standard business model for API first and cloud infra products which are developer facing. Developers would need to create test accounts and production accounts but receive invoices which are consolidated. For the consolidation, you can create a group that contains all the accounts of the customer.
- Company with multiple teams (standalone invoice) - If you have a company where you have multiple teams each subscribed to different products/contracts, you can configure this by creating every team as an account within Togai. You can then associate the individual product price plan + custom override configuration for each account and generate standalone invoices.
- Company with multiple teams (consolidated invoice) - This is similar to the above except that the invoice has to be consolidated at the company level. This is mostly the case when you sell to larger companies who have centralized budget approvals. You can create an invoice group that consolidates the invoices of the individual accounts into a single one.
- Parent company with subsidiaries - Here, you can treat them equivalent to a company with multiple teams with standalone invoicing requirements since the subsidiary would have individual standalone budgeting needs. But you can still view revenue metrics at the parent company level as well as the subsidiary level.
- Reseller/partner relationship - In many instances of B2B software offerings, you have a channel partnership or resellers who have a distribution setup and offer your products to end customers. This can also be modelled in Togai as a parent-child relationship where the reseller/partner can be created as a customer and the end customer of the reseller is modelled as an account in Togai.
- Complex org structure - Any combination of the above can be setup in a single instance of Togai without complexities and using simple to use configurations via our dashboard.
Price plan association
When customers purchase or subscribe to your product, you can model that in Togai by associating the corresponding price plan to the respective account. When making an association, you can configure the following details - Effective from date - This is the start date of the subscription/contract and is applicable for recurring plans.Effective Until - This is the end date of the subscription/contract and is applicable for recurring plans. The plan will be detached on this date and customers will not be billed post this date. Usage tracking and metering is independent of this.
Cycle and rate card overrides - Learn more